
Most teams start carbon accounting by picking a tool before they review their existing ERP data. Vendors are duplicated, locations are inconsistent, and nobody owns the process. Getting your ERP for carbon accounting ready before the first calculation saves weeks of cleanup later. This guide walks through the NetSuite preparation steps we recommend, drawn from the CarbonSuite NetSuite Handbook.
The order is key when you set up an ERP for carbon accounting. Some steps are hard prerequisites, like GHG Periods and a base year. Others, like clean master data, decide how accurate your first inventory turns out.
Why an ERP for Carbon Accounting Starts With Data You Already Have
Your ERP already records the purchases that drive most emissions. Electricity bills, fuel, business travel, and freight all pass through it. An ERP for carbon accounting reuses those records, so nobody has to upload a second data set. In the same way finance closes the books each period, your sustainability team closes GHG Periods.
CarbonSuite is built natively inside NetSuite, so this guide uses its terms. The calculation methodology follows the GHG Protocol Corporate Standard. If you want the bigger picture first, our post on what a carbon ledger is explains how each emissions figure ties back to a source transaction.
Step 1: Name a Carbon Controller and Brief Your Stakeholders
Carbon accounting is an ongoing task, just like financial accounting. So an ERP for carbon accounting needs an owner. At a minimum, you need one person to act as the Carbon Controller. This person owns the process, the same way the Corporate Controller owns financial accounting. They also work with stakeholders across the business and your value chain to collect data and validate results.
Then look at who else touches the data. Employees will track extra details on Expense Reports. The accounting team will track extra details on Vendor Bills and Credit Card Transactions. Tell these groups early and often, because change management decides whether the data shows up complete.
Note: the Carbon Controller role cannot edit Item records for security reasons. So line up someone with Item edit access before you reach the Item setup step.
Step 2: Set the Scope Your ERP for Carbon Accounting Must Cover
Start with the GHG Protocol scopes. All reporting frameworks require Scope 1 and Scope 2 in full, and most require material Scope 3 emissions. Rank your emission categories by impact on your operations, then prioritize the largest ones first.
Next, choose your organizational boundary. The Handbook describes three approaches:
- Equity share: you account for emissions according to your share of ownership.
- Financial control: you account for the organizations whose financial and operating policies you can direct.
- Operational control: you account for 100% of emissions from operations you or a subsidiary control.
In NetSuite, you set this per Subsidiary on an Organizational Boundary record. Each Subsidiary represents an element of your boundary, so your subsidiary structure needs to match the approach you plan to report against.
Finally, confirm which frameworks apply to you. Requirements vary by size, region, industry, and public or private status. Our Sustainability Disclosure Tracker keeps the key global frameworks up to date.
Step 3: Create GHG Periods and a Base Year Policy
A GHG Period works like a financial accounting period, but it groups emission transactions. Every ERP for carbon accounting setup needs them. Here is the catch. You cannot calculate emissions until a GHG Period exists for the matching date range. So create GHG Periods for every month or year you plan to cover.
Your base year needs is the reference point for tracking change over time. Pick the earliest relevant year for which you have reliable data, and keep in mind that a recent year is usually preferred. To submit a target to the Science Based Targets initiative, your base year must be 2015 or later. Also, you cannot set targets at all without a base year, because every target is relative to it.
Then write a recalculation policy. It should state when you will restate base year emissions, such as after a merger, a divestment, a methodology change, or the discovery of significant errors. It should also state your significance threshold. The Handbook notes that 5% is typical. Organic growth or decline, and facilities that did not exist in the base year, do not trigger a recalculation.
Step 4: Clean Up the Records Behind Your ERP for Carbon Accounting
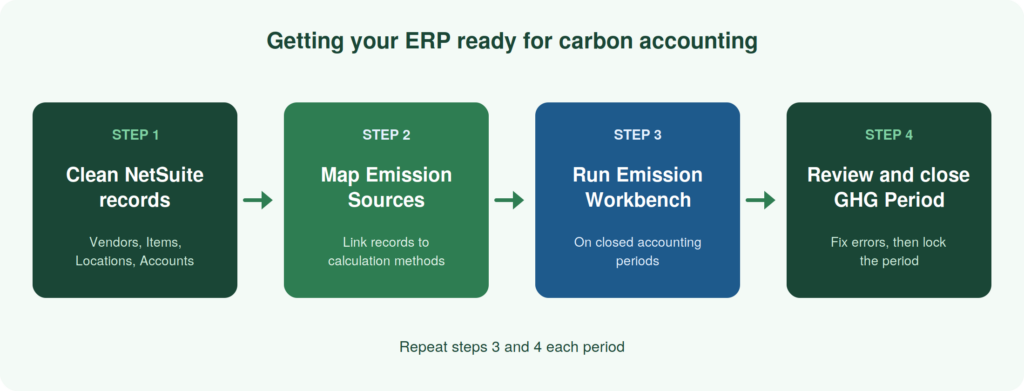
This step has the biggest effect on data quality. Every Emission Source maps to NetSuite master data, such as a Vendor, Item, Account, Location, Subsidiary, or Expense Category. The Emission Workbench then uses that mapping to match transactions automatically. As a result, messy master data produces messy matches.
Here is what to check before your first run:
- Inactive records: The Emission Workbench cannot process transactions that reference inactive records. The GHG Transaction is still created, but without the inactive reference. Review inactive Vendors, Items, Accounts, and Locations that still appear on transactions in your reporting period.
- Overlapping mappings: One common error is finding multiple Emission Sources with the same transaction search criteria. Duplicate Vendors are a frequent cause, so merge or retire them first.
- Location details: If a Location has its country, state, and zip code filled in, those values flow onto the Emission Source. A zip or postal code is also required for Scope 2 emissions, because CarbonSuite uses it for the grid location calculation method.
- Item conversion fields: If you plan to use the Per Unit Purchased activity type, fill in the Emission Conversion Rate and Emission Conversion Unit on the Item’s Carbon Accounting subtab.
To see what still needs a mapping, open the Emission Source Mapping saved search. It lists the Vendor Bills, Expense Reports, and Credit Card Transactions that have not yet been used in a calculation. Add the Subsidiary and Location columns if you map to those fields, because the standard search leaves them out.
AI helps manage the workload of setting up and mapping your emission sources.
Step 5: Let AI Scan Capture Activity Data From Your Attachments
Your accounting team already attaches the utility PDF to the Vendor Bill. AI Scan reads that attachment for you. In an ERP for carbon accounting, this removes one of the slowest manual jobs, which is keying kilowatt hours, gallons, or miles from a document into a field.
AI Scan analyzes the PDFs attached to your NetSuite transactions. As a result, the activity data comes straight from the source document. Setup takes two fields on the Emission Source:
- Enable AI Scan: Check this box so the Emission Source is considered by AI Scan. If it stays unchecked, AI Scan will not run.
- AI Context: Use this field to give the AI extra instructions. For a Scope 2 purchased electricity source, you could write: “Search for energy consumption in KiloWatt Hours. There are 5 separate meters.”
Better context produces better results. AI models still make mistakes, so expect to experiment with your wording before it works well for a given vendor or bill format.
Then plan for a human check. After the Emission Workbench runs, every emission from an AI Scan source lands on the For Review tab with the message “CS-NS-1234: Valid AI Scan.” This is a deliberate precaution. Compare the extracted values against the PDF, then edit and save the record to move it to the Posted tab.
You can also enter activity data directly on the transaction line. CarbonSuite adds six fields to Vendor Bills, Expense Reports, and Credit Card Transactions: Activity Amount, Activity Unit, Fuel Type, Emission Source, Emissions Amount (CO2e), and Emissions Unit (CO2e). For example, an Expense Report for a flight would carry miles or kilometers. If a vendor gives you the CO2e figure, enter it and skip spend-based or activity-based estimates. Activity Unit, Fuel Type, and Emission Source only appear in the transaction dropdowns when “Allow on NetSuite Transaction” is checked on the matching record.
Step 6: Plan for Emissions Data That Lives Outside NetSuite
Some of your data will never pass through a Vendor Bill, and your ERP for carbon accounting still needs a place for it. Common examples include mileage and fuel use from company-owned assets, utility data, employee commuting, refrigerant leaks, and supplier-provided data. Downstream categories often fall here too.
Decide early which categories these are. Then create Emission Sources for them, either in the user interface or by CSV import. You can also integrate the data from the source system directly via API.
Step 7: Build a Repeatable Emission Workbench Routine
Once the setup is done, the Emission Workbench becomes the routine that keeps your ERP for carbon accounting running each period. The Handbook gives a few rules that keep it reliable:
- Run it on closed NetSuite accounting periods, so later edits to transactions do not disturb your carbon results.
- Run it for no more than three months at a time, and keep script concurrency at 3 or below.
- Plan for a run to take longer than just a few minutes, depending on the date range.
After each run, work through the For Review tab. Common causes of errors include a missing Emission Source, a zero Amount or Activity Amount, a missing emission factor, and wrong units. Fix each record and save it, and it moves to the Posted tab. Then validate your GHG Transaction errors before you lock or close the GHG Period.
Your ERP for Carbon Accounting Readiness Checklist
Use this list before your first Emission Workbench run:
- A Carbon Controller is named, and stakeholders know what data they owe.
- Scopes, categories, and reporting frameworks are defined.
- Organizational Boundary records exist for each Subsidiary.
- GHG Periods exist for every date range you will calculate.
- A base year and recalculation policy are documented.
- Inactive records and duplicate Vendors are cleaned up.
- Locations have complete address details.
- “Allow on NetSuite Transaction” is checked on the units, fuel types, and Emission Sources you want on transactions.
- Data outside NetSuite has a home in Emission Sources.
- The accounting periods you plan to process are closed.
Frequently Asked Questions
How do I prepare my ERP for carbon accounting?
Start by naming a Carbon Controller, define your scope and boundary, and create GHG Periods and a base year policy. Then clean up the NetSuite records your Emission Sources map to, and decide what activity data to capture on transactions.
Which NetSuite transactions can be used for carbon accounting?
The Emission Workbench currently supports Vendor Bills, Expense Reports, Credit Card Transactions, Journal Entries, Item Receipts, Item Fulfilments, and Invoices. Each matching transaction line becomes one GHG Transaction.
Why do I need a base year before setting targets?
Every emissions target is relative to a base year. Without one, there is nothing to measure progress against.
When should I run the Emission Workbench?
Run it on closed accounting periods, no more than three months at a time. Closed periods prevent later transaction edits from changing your carbon results.
Can I track emissions data that is not in NetSuite?
Yes. Create Emission Sources for that data, then record the emissions in the user interface or with a CSV import.
If your team already runs on NetSuite, which of these seven steps would take the longest to get your ERP for carbon accounting ready? Get in touch and we will help you map out your own preparation plan. You can also read more about our carbon accounting software for NetSuite.
